Get started
This is the guide for new technical staff working in OPG. If you just joined, 👋 welcome!
If you are having trouble with this guide, you can ask your colleagues or the #opg-developers channel in Slack.
1. Install the Homebrew package manager (on macOS or Linux)
/bin/bash -c "$(curl -fsSL https://raw.githubusercontent.com/Homebrew/install/master/install.sh)"
Check out this list of recommend tools to install
2. Set up your GitHub account
- Set up a GitHub account. Existing personal accounts are fine to use.
- If you have a Copilot subscription on your existing personal account, the organization policy will overwrite your preferences.
- Add yourself to the ministryofjustice organisation through this access link (this will require you to add your work email address to your account)
- This will not give you access to any OPG repos, you will need to be added to specific teams in the organisation for this: a WebOps engineer can help you with this
- Generate and register an SSH key pair for your laptop for your GitHub account. You should use a
4096bit key. While you are here, associate your name and email to your git commits:
$ git config --global user.email "friendly.giraffe@digital.justice.gov.uk"
$ git config --global user.name "Friendly Giraffe"
3. Get AWS access
To work with products and services at OPG, you will require an account in AWS.
Request an account
AWS accounts are all managed in code using terraform. They are defined in the opg-org-infa repository, If you have been put into the OPG team on GitHub, your AWS account would have been created at the same time.
Ask your team’s WebOps engineer to set your password.
Sign in to AWS
To sign in, go to the OPG AWS Sign page, and use the following credentials:
- “Account ID or alias”:
opg-identity - Username: firstname.lastname
- Password: your password
Set up your MFA
You have to set up Multi-Factor Authentication (MFA).
- Sign in to AWS account
- Select or go to IAM service.
- Click on “Users” in the menu bar on the left hand side
- Enter your name
- Click on the link for your name
- Click on the security credentials tab
- Click on the “Manage” link next to “Assigned MFA device”
- Follow the steps to set up your MFA device NB: The “Device name” needed for the MFA will need to link to your identity. It should look something like firstname.surname-authy
- Log out and log back into your AWS account
Get the appropriate access
An account in AWS does not give you access to anything, you’ll need to be given rights.
Ask your teams WebOps engineer to pair with you on getting the appropriate access.
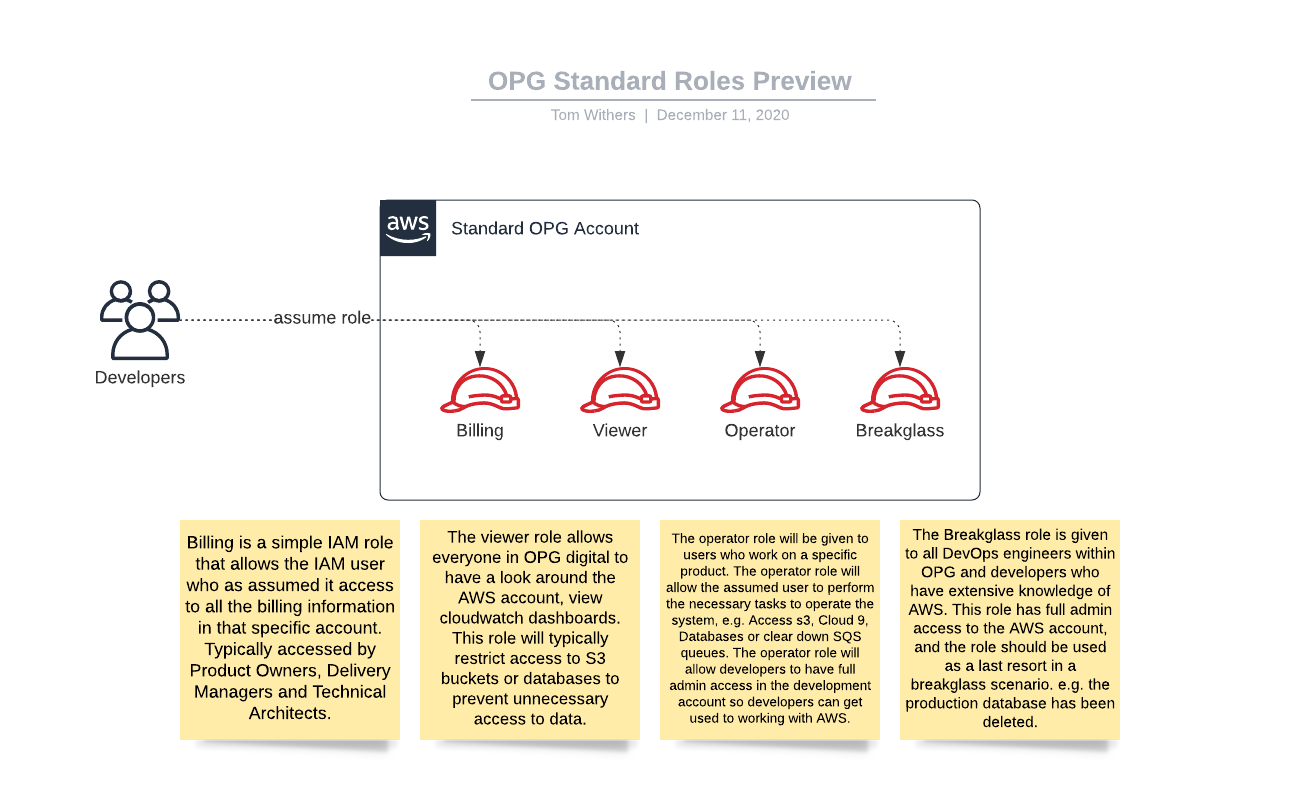
4. Set up AWS Roles
Identity is the account where your user identity is stored, but there are no usable resources in this account. To perform useful work, you will need to switch up to a role in another account. See the AWS docs for detailed information on how to do this.
Here is a small diagram that explains what each role is for:
Role switching
The AWS console now supports signing into multiple accounts.
Alternatively, you can use the aws-extend-switch-roles Chrome extension. You will be able to add the roles you require into the plugin.
If you intend to use the CLI then you will need to set up role profiles in your AWS config file.
All the roles can be found here
5. Set up AWS Vault
Install AWS Vault
AWS Vault stores IAM credentials in your operating system’s secure keystore and then generates temporary credentials from those to expose to your shell and applications.
brew install --cask aws-vault
Generate a pair of access keys
You have to generate an AWS Access Key and Secret Key to be able to perform operations with AWS on the command-line.
- Sign in to the AWS Console.
- Click on your email address in the top right.
- Click ‘My Security Credentials’.
- Click ‘Create access key’.
- The secret access key will only be show once, so download the access key or keep them on screen.
Setup aws-vault with opg-identity
- Run the add command
aws-vault add identity
- You will be prompted for an Access Key ID which will be on you screen in the AWS Console.
- Hit Enter, Now you will be prompted for secret access key.
- Next open your profile in a text editor and edit it to use your MFA mfa_serial.
The file is~/.aws/configand add
mfa_serial=arn:aws:iam::631181914621:mfa/<aws.mfa-device-name>
NB: This
- You can run the following command to make sure everything works
aws-vault exec identity -- aws sts get-caller-identity